FIRST WebAdmin Help Version 2.16 © 2012 FIRST Software Solutions Pty Ltd
FIRST WebAdmin provides the ability to upload files directly to a nominated location. This functionality was implemented to make the storing of documents available in FIRST via a web interface.
The example below demonstrates the basic setup for a repository within the OPAC however the document repository does not have to be a location within the OPAC application; it can instead point to another shared location as long as the AttachmentPath and AttachmentURL properties below point to the same location and FIRST has the correct permissions to be able to copy files into that location.
To enable this functionality WebAdmin must be version 2.15 or higher and the correct paths must be set up within the WebAdmin System Properties.
Setting up the AttachmentPath in System Properties
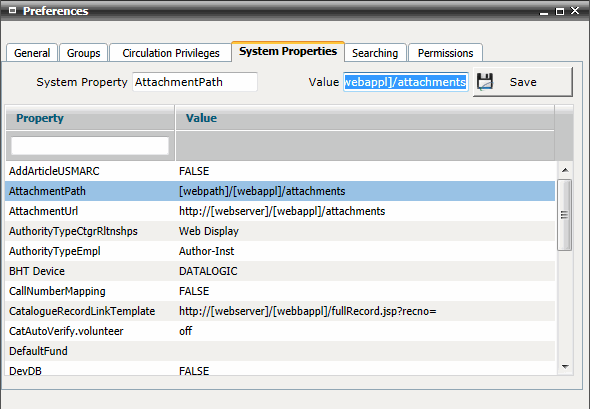
Go to UTILITIES>Preferences>System Properties tab
Locate the AttachmentPath Property and highlight it. This will populate the System Property and Value at the top of the tab.
Click in the Value field. If this field is blank or incorrect enter the correct network path location for the /attachments folder in your OPAC. This path may need to be supplied by FIRST in the case of Hosted systems or by your IT for those systems hosted in-house. The standard pattern for the AttachmentPath is as follows:
[webpath]/[webappl]/attachments
Where [webpath] is the network location of the OPAC and [webappl] is the OPAC application root folder name - eg. G:/Tomcat 6.0/FIRST/firstopac/attachments
Click the Save button to save this value
Setting up the AttachmentPath in System Properties
Go to UTILITIES>Preferences>System Properties tab
Locate the AttachmentURL Property and highlight it. This will populate the System Property and Value at the top of the tab.
Click in the Value field. If this field is blank or incorrect enter the correct URL location for the /attachments folder in your OPAC. This path may need to be supplied by FIRST in the case of Hosted systems or by your IT for those systems hosted in-house. The standard pattern for the AttachmentURL is as follows:
http://[webserver]/[webappl]/attachments
Where [webserver] is the webserver name of the OPAC and [webappl] is the OPAC application name (eg.http://library/firstopac/attachments )
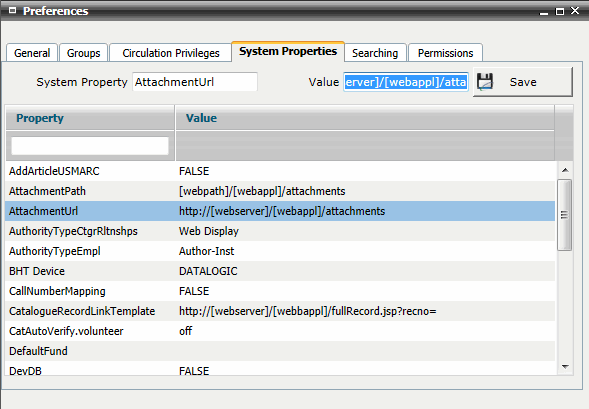
Click the Save button to save this value
Uploading an Attachment via the Links tab
Search and display the full Catalogue record
Select the Links tab and right click in the summary grid
Select Add Attachment - this will generate the Attachments pop-up window
Select [Add] to open a File Upload browser window
Locate the file to be uploaded, select and click [Open]. This will close the browser window and add the file to the Attachments window
Click [Upload] to upload the file to the webserver.
Close the Attachments window – the new Link will be populated with a link to the uploaded file address
Uploading an Attachment via the Shelf Item full record
Search and display the full Catalogue record
Create or open a shelf item on the Shelf tab
Click the browser icon to the right of the Link Address field - this will generate the Attachments pop-up window
Select [Add] to open a File Upload browser window
Locate the file to be uploaded, select and click [Open]. This will close the browser window and add the file to the Attachments window
Click [Upload] to upload the file to the webserver (Clicking [Save Link] will only save a direct link to the file at its current location)
Close the Attachments window – the shelf item Link Address will be populated with a link to the uploaded file address